Wednesday, 26 December 2012

How to show all the files and folder hidden by virus using Command Prompt in Windows 7 and XP

0 comments
Sometimes we got problem when our computer has so much viruses and our antivirus failed to detect them. We insert our external device like pen-drive, Flash drive or memory card or any other external storage device and all the data of the devices are got hidden and a shortcut to those files are created. On that case the files are not deleted they are hidden by the virus. Complete the below process and you can able to show all the hidden files.

Also Check: How to check whether our anti virus is working perfectly or not.

Process:
1. Open Command Prompt(cmd) as an administrator.
2. Navigate to the drive whose files are hidden in the CMD screen.

3. Then type attrib -s -h -r /s /d *.* and hit Enter

Also Check: How to see all the hidden files without using Command Prompt

4. That is it. Now you will able to see all the hidden files that are on the external drive.

Other Similar articles that may interest you:
1. Top reasons why a system hangs or crashes
2. How to break mobile passwords.
3. How to delete the pagefile.sys from Windows XP, Vista and Seven drive.
4. How to remove the arrow symbol placed in Windows 7 shortcut
5. Microsoft Office Excel 2013 Working Keyboard shortcuts
6. How to install ubuntu inside Windows
7. Google Book Downloader free download for Windows and MAC
8. How to download a youtube Video
9. Removewat- Windows 7 Genuine Activator Free Download
10. IDM latest free download with key
Continue reading →

Microsoft Windows Xp Service Pack 2 and 3 Genuine Serial key free download

7 comments
Continue reading →

How to check and modify the Windows XP Serial key using Magical Jelly Bean Key finder v 1.41

0 comments
The process will show you how can we extract the Windows XP serial key from the Installed Operating system and the modify it with the new one. The change of serial key is required to make your Windows XP genuine with the updated Genuine key. To modify the serial key we need a third party software named as "Magical Jelly Bean Key-finder"
Also Check: Windows Seven Ultimate Genuine Serial key free download
Process:
1. Download and open "Magical Jelly Bean Key finder" (No need to install).
The open Windows will show the installed operating system version and the serial key (CD Key) that is entered at the time of installation.
2. Now click on "Options" on the menu bar then select "Change Windows Key"
3. A new window will be opened asking for another serial key. Just enter the new Genuine Serial key.

Also Check: Microsoft Windows Xp Service Pack 2 and 3 Genuine serial key free download

4. After entering the serial key, click on "Change".
5. It will show the Confirmation Message that "Your Product key has been successfully updated. Restart the keyfinder to verify it".
That is it. Now your old Windows XP serial key is successfully updated.

Download Link : Magically Jelly Bean key finder

Other Similar articles that may interest you:
1. IDM with serial key free download latest version
2. Google chrome download free latest version
3. Total video converter full version free download
4. Avast 2013 with serial key free download
5. How to add three level password on Microsoft office document
6. How to recover your lost deleted data in Windows
7. Add you required folder to the left side favorite bar in Windows 7 explorer
8. How to get secured from unwanted calls on Samsung Mobile
9. How to deactivate a face-book account temporarily
10. Microsoft office Excel 2010 and 2013 working keyboard shortcuts
Continue reading →
Sunday, 23 December 2012

Genuine Serial key of Windows Seven Ultimate, Home Basic and Home Premium Free download (HP, Sony, Lenovo)

3 comments
These are the list of some Windows Seven Genuine Serial Key which works depending upon the system. These keys are found on the Back side of some Laptops and desktop.

Windows Seven Home Basic Key

LENOVO:           XF2TW-TGV4P-YBMHZ-CWTVV-FXCC7
SONY VAIO:      4CYBR-H33MD-G76C7-YBMYK-8HJKC
HP PAVILION:   MMVWM-JJTWF-WHM8Y-VGY44-F8PG2

Windows Seven Home Premium Key

HP PAVILION:  VHXT3-67JFX-RMTT7-F6PCB-GB42Q

For all other versions (Ultimate, Business, Home Basic and Premium) of any system they can use the RWAT (Windows 7 activator) to make it registered full version.

Also Check: RWAT (Remove Wat 2.2)free download Full Version

NOTE: If anyone have brought a new PC/Laptop and find a Windows 7 Genuine serial key then he can share it here to others. For the same we publish his name with a link to his personal profile (Google, Facebook, twitter or any social media but not a blog or website). Interested people mail at adm@mihirbabu.com with the name, Social profile address with Genuine key to see his name here.

Other Similar articles that may interest you:
1. How to Change the Processor name in Windows
2. Various reason of System Hangs In Windows
3. How to add a logo to a video file in Windows
4. How to create a background Image for a pen-drive
5. How to create a Paypal donation button in INDIA
6. How to restore the deleted Recycle Bin icon on Desktop
7. How to make a windows drive hidden unsearchable
8.  How to break a Samsung Mobile Password
9. How to check the Antivirus whether it is working or not in Windows.
10. How to make Windows 7 Ultimate Genuine  
Continue reading →
Friday, 21 December 2012

[Update] IDM 6.16 with serial key free download full crack patch and keygen Latest version 2013

8 comments
What is new in Internet Download Manager v 6.15 and How to make it a full version
Internet Download Manager v6.16. Is Windows 8 compatible. Fixed compatibility problems with different browsers including Internet Explorer 10, all Mozilla Firefox versions up to Mozilla Firefox Aurora, Google Chrome. Improved FLV grabber to save videos from web players on YouTube,  Google Video, MySpace TV, and other popular sites

Download Link: http://www.internetdownloadmanager.com/download.html

How to make IDM v 6.16 Full version with the serial key using the Crack method and Keygen
To make your IDM full version we have to complete the three steps. After completion of these steps Internet Download Manager will be registered for a lifetime and work similar to genuine and work with full features.
  • Take the ownership of the hosts file 
  • Modify the hosts file
  • Enter the serial key and Make IDM full version

Also Check: How to increase the speed of torrent download

Why and how to take ownership of the hosts file
If we don't change the ownership of the hosts file to our local user (On which you are currently logged in) then we are unable to modify it. Without modification the Crack process will not work.
Process: Navigate to C:\WINDOWS\system32\drivers\etc and change the ownership of the "hosts" file to your local user.

Also Check: How to take ownership of the hosts file in Windows XP and Seven and Windows 8

What to modify in the Hosts file
After taking the ownership, Open the Hosts file with notepad. Copy the below text (the text that are on bold letter) and paste it  and save the hosts file.
127.0.0.1 tonec.com
127.0.0.1 www.tonec.com
127.0.0.1 registeridm.com
127.0.0.1 www.registeridm.com
127.0.0.1 secure.registeridm.com
127.0.0.1 internetdownloadmanager.com
127.0.0.1 www.internetdownloadmanager.com
127.0.0.1 secure.internetdownloadmanager.com
127.0.0.1 mirror.internetdownloadmanager.com
127.0.0.1 mirror2.internetdownloadmanager.com

Enter the Serial Key and Make Internet Download Manager full version
1. Open Internet Download Manager -> Registration (On Menubar) -> Registration
2. Enter the First name, Last name and the Email address n the required box.
3. Now copy one set of the serial key from below and paste it on the Serial key box.
     RLDGN-OV9WU-5W589-6VZH1
     HUDWE-UO689-6D27B-YM28M
     UK3DV-E0MNW-MLQYX-GENA1
     398ND-QNAGY-CMMZU-ZPI39
     GZLJY-X50S3-0S20D-NFRF9
     W3J5U-8U66N-D0B9M-54SLM
     EC0Q6-QN7UH-5S3JB-YZMEK
     UVQW0-X54FE-QW35Q-SNZF5
     FJJTJ-J0FLF-QCVBK-A287M

Also Check: How to password protect a website in Windows Xp, Vista, Seven and Eight

4. Now click on OK to register your IDM for life time.
5. It will show a warning message that one of the system file is damage. Ignore the message and Click "Cancel" . Never Choose continue. That is it. Now your IDM is registered.

Note: It is better not to update your IDM to use it as genuine.

Also Check: Free download Full Version IDM

Other Similar articles that may interest you:

1. Microsoft Office Word 2010 working Keyboard shortcut keys
2. How to download a you-tube video using IDM
3. How to change the name of the Windows drive from Local disk to any other name
4. Google Chrome latest version free download
5. How to customize the Win-zip Command on the context menu of Windows.
6. Add Open With notepad option to context menu as a shortcut in Windows 7
7. How to take a screen shot from the Windows seven desktop.
8. How to move the details pane to top from bottom in Windows 7
9. How to install a registry file in Windows 7 ultimate
10. Finger arrangement in keyboard to become a fast typist

Update Notice: Last Updated on 28th April 2013

Continue reading →
Thursday, 20 December 2012

Mini Tool Power Data Recovery v 6.6 With Serial Key free download latest Full version

14 comments
Mini-tool power data recovery software is used to recover the lost data in Windows Operating System.It supports Windows XP, Vista, Seven, Eight. It has Five Important Modules to recover data.
  • Undelete Recovery: It recovers the file that were also deleted from the Recycle bin (Shift+Delete). It supports FAT12, FAT16, FAT32, VFAT, NTFS and NTFS file systems on  hard disk, flash drive, memory stick, memory card and flash card. 
  • Damaged Partition Recovery:  It recovers the data from the Damaged Hard drive no matter the hard drives is reformatted. It will able to recover the data when the Undelete Recovery option is not working.
  • Lost Partition Recovery: It is designed to recover the data from the Lost Partition. It can recover your data when hard drive crashed, MBR corrupted, disk repartitioned (fdisk) and partition be overwritten when you use data backup software to restore the disk image. When Damaged Partition recovery fails to recover data then use Lost Partition Recovery to recover data.
  • Digital media Recovery: It recovers the lost data from the digital media like flash drive, mp3 player, digital camera,memory stick, memory card, iPod etc.
  • CD? DVD recovery: It recover lost and deleted files from damaged, scratched or defective CD and DVD disks. It can recover files recorded by common CD/DVD writing software. It supports all type of  CD and DVD disc (CD-ROM, CD-R, CD-RW, DVD-ROM, DVD-R, and DVD-RW), and from quick formatted RW discs. It also supports disc recorded with UDF packet writing software: DirectCD, InCD, packetCD. 

Serial Keys of Mini Tool Power Data recovery 6.6

Each Line represents a Serial key set. There are several sets of keys on Commercial license, Enterprise License and Personal License. Choose one of the Key set according to your requirement.

Personal License Key:
45KAWUWK3U8MWKYUYPKU3M85PMA8VUPA
S5ACFAWPKP58YMXMCYC3A84KVM4M5FPF

Enterprise license Key:
U3V8K84PKVCVY34F45K8VCYMF4M38PU3
K3VY44PKYASSSVY4W3UYP3A38CVVVWUA

Commercial license Key:
UUMMY8WX8VVSWSSCPKCVUC54PAF34K5K
KUAYUKW3M5885UKWMFASSC5KXMW3C55K


Other Similar articles that may Interest you:
Continue reading →
Sunday, 16 December 2012

Facebook keyboard shortcut 2013 Working Hot-Keys

0 comments
Face book uses the combine keyboard shortcuts i.e. More than one keys to be pressed to access the shortcuts. Out of which some keys are depends upon the type of Operating system and the browser are you using.
Also Check: How to deactivate the Face book account temporarily.

For Windows Operating System:
Google Chrome          Alt
Mozilla Firefox            Alt + shift
Internet Explorer         Alt

For MAC OS X:

Firefox           Function + Ctrl
All other        Option + Ctrl

Note: All the shortcut keys works on the numbers that are placed on the top of the keyboard. Not from the notepad. If you are using Google Chrome (In Windows OS) then You have to press the Alt key and a number from shortcut simultaneously to use the shortcuts. Similarly for other browser with the operating system use their respective combo key.

Shortcuts Functions
M Open a new message *
? Go to the Facebook Search
1 Home (News Feed)
2 Your profile page
3 Friend requests
4 Messages
5 Notifications
6 Your Account Settings
7 Your Privacy Settings
8 Go to the Facebook page
9 View Facebook Statements and Rights agreement
0 Open Facebook help center

There are also some Keyboard shortcuts which are used in Face-book Chat and it does not require any combo key.
Also Check: Some Working Keyboard shortcuts on yahoo Mail!

Esc Closes the current chat window
Shift + - Hides the current chat window if no text is entered
TAB - Jumps to the next chat window
Shift + TAB- Jumps to the previous chat window

Other Similar articles that may interest you:
Continue reading →
Friday, 14 December 2012

How to Show Hide the Extension of files in Windows 7 and XP

0 comments

What is a file name Extension: 

A file name extension is a suffix (separate from the base file name by a dot) to the name of the computer file. A file name extension is a set of characters that helps Windows understand what kind of information is in a file and what program should open it. It is called an extension because it appears at the end
of the file name.
E.g. If a file has name xxx.txt then its extension is txt and Notepad or any other text editor is required software to open that.
Note: If we change the extension of the file name then its required program may fail to open it.

How to enable Disable the view of Extension of file name in windows 7 and Xp


1. Click "Tools" on the menu bar and select "Folder option".

2. Navigate to "view" tab.
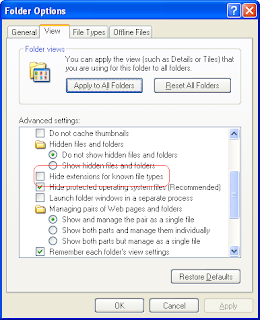
3. Under "Advanced setting" you will find an option "Hide extensions for known file types"
  • To hide file extensions, select the Hide extensions for known file types in the check box.
  • To display file extensions, clear the Hide extensions for known file types in the check box.

4. Now "Apply the Changes" and Click on "OK". That is it.
Other Similar articles that may interest you:
1. How to add password on a rar file
2. IDM free download full version
3. Any To ISO Pro with serial key free download
4. How to create an invisible folder
5. Google Chrome latest version free download  
6. How to add three level password on Microsoft office Word
7. How to take a screen shot in Windows 7 ultimate
8. How to Hard reset a Nokia N series Mobile
9. How to open a blocked website in School college and office
10. Google chrome latest version offline installer free download  
Continue reading →
Tuesday, 11 December 2012

How to Remove Add Chat from Gmail (Turn on or off Google Chat from the left side pane of Gmail)

0 comments
We find a chat option present at the left side of Gmail (after login) for chat between our Google Friend Circle and Google Contacts. We can also enable/disable or Turn on/off these option as our Wish.
Also Check: Some of the Working Keyboard shortcuts on gmail

Process to turn on or off the Chat from gmail

1. Login to your Gmail account using your Email ID and Password.
2. Click on the setting Icon  on the upper right side of Gmail and Choose "setting".
3. Navigate to "Chat" Tab in Setting.
4. On the "Chat" You will find two option
  • Chat on
  • Chat off
5. If you want to enable the chat for Gmail then choose "Chat on" otherwise if you don't wish to chat then Choose "Chat off".
6. Click on "Save Setting".
Now you will able to turn on or off the Chat for Gmail. That is it.

Also Check: How to test our antivirus program whether it is Working or not

Other Similar articles that may interest you:
Continue reading →
Sunday, 9 December 2012

Gmail keyboard Shortcuts Working Hotkeys (Google Mail)

0 comments
These are the list of some working keys or the combination of hotkeys that are supported on Google Mail.  Keyboard shortcuts help us to save our time as we are not moving our hand from keyboard to use the mouse. You will need a standard 101/102-Key or Natural PS/2 Keyboard to use these shortcuts easily.

Also Check: Yahoo mail working Keyboard Shortcuts

Before using the keyboard shortcuts on Gmail, You need to first enable the keyboard shortcuts use in Gmail.

Also Check: How to enable disable the keyboard shortcuts used in Gmail.

Shortcut Key Definition Action
c Compose Allows you to compose
a new message. <Shift> + c allows you to compose
a message in a new window.
/ Search Puts your cursor in the search box.
k Move to newer conversation Opens or moves your cursor
to a more recent conversation. You can hit <Enter> to expand
a conversation.
j Move to older conversation Opens or moves your cursor
to the next oldest conversation. You can hit <Enter> to expand
a conversation.
n Next message Moves your cursor to the
next message. You can hit <Enter> to expand or collapse a message.
(Only applicable in 'Conversation View.')
p Previous message Moves your cursor to the
previous message. You can hit <Enter> to expand or collapse
a message. (Only applicable in 'Conversation View.')
o or <Enter> Open Opens your conversation.
Also expands or collapses a message if you are in 'Conversation View.'
u Return to conversation list Refreshes your page and returns you to the inbox, or list of conversations.
e Archive Archive your conversation from any view.
m Mute Archives the conversation, and all future messages skip the Inbox unless sent or cc'd
directly to you.
x Select conversation Automatically checks and
selects a conversation so that you can archive, apply a label, or choose
an action from the drop-down menu to apply to that conversation.
s Star a message or conversation Adds or removes a star
to a message or conversation. Stars allow you to give a message or conversation
a special status.
+ Mark as important Helps Gmail learn what's important to you by marking misclassified messages. (Specific to Priority Inbox)
- Mark as unimportant Helps Gmail learn what's not important to you by marking misclassified messages. (Specific to Priority Inbox)
! Report spam Marks a message as spam
and removes it from your conversation list.
r Reply Replies to the message sender.
<Shift> + r
allows you to reply to a message in a new window. (Only applicable in 'Conversation View.')
a Reply all Replies to all message recipients.
<Shift> +a
allows you to reply
to all message recipients in a new window. (Only applicable in 'Conversation View.')
f Forward Forwards a message. <Shift>
+ f
allows you to forward a message in a new
window. (Only applicable in 'Conversation View.')
<Esc> Escape from input field Removes the cursor from your current input field.
<Ctrl> + sSave draft Saves the current text as a draft when composing a message. Hold the <Ctrl> key while pressing s and make sure your cursor is in one of the text fields -- either the composition pane,
or any of the To, CC, BCC, or Subject fields -- when using this shortcut.
# Delete Moves the conversation to Trash.
l Label Opens the Labels menu to label a conversation.
v Move to Moves the conversation from the inbox to a different label, Spam or Trash.
<Shift> + i Mark as read Marks your message as 'read' and skip to the next message.
<Shift> + u Mark as unread Marks your message as 'unread' so you can go back to it later.
[ Archive and previous Removes the current view's label from your conversation and moves to the previous one.
] Archive and next Removes the current view's label from your conversation and moves to the next one.
z Undo Undoes your previous action, if possible (works for actions with an 'undo' link).
<Shift> + n Update current conversation Updates your current conversation when there are new messages.
q Move cursor to chat search Moves your cursor directly to the chat search box.
y Remove from Current View* Automatically removes the message or conversation from your current view.
  • From 'Inbox,' 'y' means Archive
  • From 'Starred,' 'y' means Unstar
  • From 'Trash,' 'y' means Move to inbox
  • From any label, 'y' means Remove the label
* 'y' has no effect if you're in 'Spam,' 'Sent,' or 'All Mail.'
. Show more actions Displays the 'More Actions' drop-down menu.
<Ctrl> + <Down arrow> Opens options in Chat
  • <Ctrl> + <Down arrow> moves from edit field in your chat window to select the 'Video and more' menu
  • Next, press <Tab> to select the emoticon menu
  • Press <Enter> to open the selected menu
? Show keyboard shortcuts help Displays the keyboard shortcuts help menu within any page you're on. (Note: Typing ? will display the help menu even if you don't have keyboard shortcuts enabled)
k Move up a contactMoves your cursor up in your contact list
jMove down a contactMoves your cursor down in your contact list
o or <Enter>OpenOpens the contact with the cursor next to it.
uReturn to contact list viewRefreshes your page and returns you to the contact list.
eRemove from Current GroupRemoves selected contacts from the group currently being displayed.
xSelect contactChecks and selects a contact so that you can change group membership or choose an action from the drop-down menu to apply to the contact.
<Esc>Escape from input fieldRemoves the cursor from the current input
#DeleteDeletes a contact permanently
lGroup membershipOpens the groups button to group contacts
zUndoReverses your previous action, if possible (works for actions with an 'undo' link)
.Show more actionsOpens the "More actions" drop-down menu.

Combo-keys - Use the following combinations of keys to navigate through Gmail.

Shortcut Key Definition Action
<Tab> then <Enter> Send message After composing your message,
use this combination to send it automatically. (Supported in Internet Explorer and Firefox, on Windows.)
y then o Archive and next Archives your conversation and moves to the next one.
g then a Go to 'All Mail' Takes you to 'All Mail,' the storage site for all mail you've ever sent or received (and have
not deleted).
g then s Go to 'Starred' Takes you to all conversations you have starred.
g then c Go to 'Contacts' Takes you to your Contacts list.
g then d Go to 'Drafts' Takes you to all drafts you have saved.
g then l Go to 'Label' Takes you to the search box with the "label:" operator filled in for you.
g then i Go to 'Inbox' Returns you to the inbox.
g then t Go to 'Sent Mail' Takes you to all mail you've sent.
* then a Select all Selects all mail.
* then n Select none Deselects all mail.
* then r Select read Selects all mail you've read.
* then u Select unread Selects all unread mail.
* then s Select starred Selects all starred mail.
* then t Select unstarred Selects all unstarred mail.
Other Similar articles that may interest you:
1. IDM free Download
2. Cyberlink Power DVD latest version keyboard Shortcuts
3. Microsoft Office Word 2010 keyboard shortcuts
4. Enable Group policy Editor for Starter and Home basic Edition of Windows 7
5. How to open a blocked Website (Youtube) in Pakistan
6. Top reasons of Windows 7 system hangs
7. How to add a warning Message before login Screen
8. google chrome offline setup free download
9. Add disk cleanup option to context menu as shortcut 
10. Typing master software free download with key
Continue reading →

How to enable disable the use of shortcuts on Gmail (Google Mail)

0 comments
To use shortcut keys on Gmail we need to enable its use first. After that Gmail will respond to keyboard hot keys.

Also Check: List of some Working Keyboard shortcuts in Google Mail
Process:
1. Login to your Gmail account using your Email ID and Password.
2. Click on the setting Icon on the upper right side of Gmail and Choose "setting".
3. Navigate to "General" Tab in Setting.
4. On the "keyboard Shortcuts" you will find two option.
  • Keyboard shortcuts Off
  • keyboard shortcuts on
5. If you want to use keyboard shortcuts then choose the On option otherwise select off.
6. Now scroll down the Horizontal Scroll bar and click on "Save Changes".
That is it. Now you can use the keyboard shortcuts for Gmail.

Also Check: Yahoo Mail! working Keyboard shortcuts

Other Similar articles that may interest you:
1. IDM free download full version
2. How to create password Protected RAR file and folder
3. How to delete deactivate a facebook account temporarily
4. How to take a snap shot from Windows 7 desktop
5. Google Chrome Private browsing Process
6. Hard-Reset Format a Nokia N series Mobile
7. How to make ultra hidden file folder
8. Customize the position of details pane from bottom to top
9. How to customize the power button action in Windows 7
10. How to install Ubuntu with Windows 7 ultimate  
Continue reading →
Wednesday, 28 November 2012

keyboard shortcut keys on GOM Player Working Hot keys

0 comments
These are the list of working keys or combination of hot keys that are supported on GOM media Player, other Media Player may or may not have the same hot-keys.
Also Check: Some Working shortcut keys for latest version of Cyberlink Power DVD

Function Keys

 [F1] : Display the About GOM Player window
 [F2] : Open File
 [F3] : Open Subtitles
 [F4] : Stop and close video
 [F5] : Open the Prefences window
 [F7] : Open/Close Control Panel window
 [F8] : Open/Close Playlist window
 [F12]: Open DVD
 Ctrl + [F5] : Set Default Aspect Ratio
 Ctrl + [F6] : Default Aspect Ratio
 Ctrl + [F7] : 4:3 Aspect Ratio
 Ctrl + [F8] : 16:9 Aspect Ratio
 Ctrl + [F9] : 1.85:1 Aspect Ratio
 Ctrl + [F10]: 2.35:1 Aspect Ratio
 Ctrl + [F11]: User-Defined Aspect Ratio
 Alt  + [F4] : Quit GOM Player
 Alt  + [F10]: Open Skin Manager
 Alt  + [F11]: Previous color-scheme
 Alt  + [F12]: Next color-scheme

Open Menu Shortcuts

 Open the Easy Browser: Ctrl + I
 Open File            : Ctrl + O (or [F2])
 Open URL             : Ctrl + U
 Open Folder          : Ctrl + D
 Open DVD             : [F12]
 Open Subtitle File   : Alt + O (or [F3])

Window Size / Position

 50%                      : 1
 100%                     : 2
 150%                     : 3
 200%                     : 4
 Fit to Desktop Resolution: 5
 Maximize/Restore         : 6
 Fit to Video Input       : 7
 Full Screen              : 8 or Alt + Enter
 Full Stretch Screen      : 9 or Ctrl + Enter
 Preset of Pan & Scan     : 0 or Ctrl + Num5
 Increase Window Size Vertically  : Ctrl + Num8
 Decrease Window Size Vertically  : Ctrl + Num2
 Increase Window Size Horizontally: Ctrl + Num6
 Decrease Window Size Horizontally: Ctrl + Num4
 Increase Window Size             : Ctrl + Alt + Num [+]
 Decrease Window Size             : Ctrl + Alt + Num [-]
 Position window top-right   : Ctrl + Alt + Num 9
 Position window bottom-right: Ctrl + Alt + Num 3
 Position window top-left    : Ctrl + Alt + Num 7
 Position window bottom-left : Ctrl + Alt + Num 1
 Position window center      : Ctrl + Alt + Num 5
 Bump window position up   : Ctrl + Alt + Num 8
 Bump window position down : Ctrl + Alt + Num 2
 Bump window position left : Ctrl + Alt + Num 4
 Bump window position right: Ctrl + Alt + Num 6
 Increase Playback Area Size: +
 Decrease Playback Area Size: -

Playback Controls

 Play/Pause           : Spacebar
 Stop                 : Ctrl + Spacebar
 Pause and Hide Player: ESC
 Fast Forward (10 sec) : Right Arrow
 Fast Forward (60 sec) : Ctrl + Right Arrow
 Fast Forward (300 sec): Shift + Right Arrow
 Rewind (10 sec)     : Left Arrow
 Rewind (60 sec)     : Ctrl + Left Arrow
 Rewind (300 sec)    : Shift + Left Arrow
 Advance by Keyframe : F
 Playback Info       : Tab
 Play Previous File (Chapter) : Page Up
 Play Next File (Chapter)     : Page Down
 Play Speed Up   : C
 Play Speed Down : X
 Default Speed   : Z

AB Repeat

 Start AB Repeat : [
 End AB Repeat   : ]
 Undo AB Repeat  : \ (Reverse Slash)

Subtitle Control

 Select Subtitle Language: S
 0.5 sec Faster : > or .
 0.5 sec Slower : < or ,
 Default Sync   : /
 Save Current Sync  : Alt + S
 Subtitle Explorer  : Alt + E
 Show/Hide Subtitle : Alt + H
 Adjust Subtitle Position : Alt + Arrow Keys
 Default Subtitle Position: Alt + Home
 Change Subtitle Thickness: Alt + B
 Increase Subtitle Size : Alt + Page Up
 Decrease Subtitle Size : Alt + Page Down

Screen Capture

 Advanced Screen Capture : Ctrl + G
 Copy Frame to Clipboard : Ctrl + C
 Capture Frame to Folder : Ctrl + E

Audio Control

Mute: M
 Choose Audio Stream: A
 Player Volume Up     : ¡Ã¨
 Player Volume Down   : ¡Ã©
 Player Volume Control: Mouse Wheel
 System Mixer Volume Up     : Ctrl + ¡Ã¨
 System Mixer Volume Down   : Ctrl + ¡Ã©
 System Mixer Volume Control: Ctrl + Mouse Wheel
 System Master Volume Up     : Ctrl + Shift + ¡Ã¨(Windows XP and lower only)
 System Master Volume Down   : Ctrl + Shift + ¡Ã©(Windows XP and lower only)
 System Master Volume Control: Shift + Mouse Wheel(Windows XP and lower only)
 Toggle Equalizer : Shift + E
 Toggle Normalizer: Shift + N
 Open Audio Preferences         : Shift + P
 Open Advance Audio Capture Menu: Shift + G
 Toggle Reverb Effect  : Shift + R
 Toggle 3D Audio Effect: Shift + S
 Vocal Filter Menu     : V

Video Color and Effect Controls

 Increase Hue : P
 Decrease Hue : O
 Increase Brightness : R
 Decrease Brightness : E
 Increase Saturation : I
 Decrease Saturation : U
 Increase Contrast : Y
 Decrease Contrast : T
 Increase Contrast and Brightness: W
 Reset Video Color Settings: Q
 Flip Input Vertically : Ctrl + Y
 Flip Output Vertically: Ctrl + V
 Toggle Smoothen Effect: Control + L
 Toggle Sharpen Effect : Ctrl + M
 Toggle Noise: Ctrl + N

Skins

 Choose skin          : K
 Open Skin Manager    : Alt + [F10]
 Previous Color Scheme: Alt + [F11]
 Next Color Scheme    : Alt + [F12]

Favorites

 Add current file to Favorites  : Alt + G
 Add current folder to Favorites: Alt + D
 Open Favorites Manager         : Alt + F

Some Other Shortcut Keys on GOM Player

 Exit GOM when finished a Movie  : Ctrl + X
 Shut Down Computer after a Movie: Ctrl + Z
 Go to DVD Root Menu          : Ctrl + Back Space
 Show Current file Information: Ctrl + F1
 Toggle "Always on top"       : Ctrl + A
 Toggle "On top while playing": Ctrl + T

Other Similar articles that may interest you:
1. How to download Audio Video using Internet Download Manager  
2. How to increase the speed of torrent Download
3. How to install Ubuntu with Windows 7 Ultimate
4. How to add password on a RAR file
5. How to show Hide the drive letter in Windows
6. Add your personal information and a beautiful photo in the System Property window
7. Latest Avast antivirus with one year working serial key free download  
8. Some more Working keyboard shortcuts on VLC Media Player
9. How to use VLC Media Player As a Camera Application  
10. How to take screen shot in Windows 7 ultimate desktop  
Continue reading →
Thursday, 15 November 2012

Change the default path location of Installing Program Application in Windows 7 and Xp

0 comments
The process will show how to change the default path for installing Application from "c:\Program Files" to any other folder. The folder may be in c:\ drive or in other drive. This process can solve the problem of low disk space error in C:\ drive.

Process: 
1. Open Registry Editor.
2. Navigate to HKEY_LOCAL_MACHINE\SOFTWARE\Microsoft\Windows\CurrentVersion
3. On the right side pane, Right click on "ProgramFilesDir" and choose "Modify".
4.  Now right the full address of new installation path in the "Value Data" field of the open "Edit String" Window.
5. Now Click on "OK".
Now reboot your system and  enjoy the new installation path for the new installed application.

Other Similar articles that may interest you:
Continue reading →
Friday, 9 November 2012

Yahoo Mail! Keyboard shortcuts working Hotkeys

0 comments

Yahoo mail has build some keyboard shortcuts to use the mail easily and effectively. We can use these hotkeys instead of choosing the commands from the menu or clicking the button on the dialogue boxes. The shortcuts are case sensitive.

Also Check: Some Working Keyboard shortcuts on Microsoft Office Word 2010.

Function Keyboard Shortcut
Check mailm
Check All Mail (includes all POP accounts)M
Skip to oldest unread messageCtrl+Shift+End
Mark As Readk
Mark As UnreadK
Flagl
(lowercase L)
Clear FlagL
Delete ItemDelete (your “delete” key)
Replyr
Reply Alla
Forward messagef
Printp
New Messagen
Save DraftCtrl+s
Send MessageCtrl+Enter
Turn Reading Pane on and offv
New FolderCtrl+E
Move message to a folderd
Put message in one of your first 9 folders1-9 (For example, type 2 for 2nd folder; doesn't work beyond 9)
Find a word or phrase in a messageCtrl+f
Close Current TabCtrl+\
Navigate through tabs—right to left motionCtrl+[
Navigate through tabs—left to right motionCtrl+]
Open message(s) in its own tabEnter (select one message at a time)
Edit contact infoEnter (select a contact first, in Contacts)
Expand window to maximum heightF11
Next message (in message tab)Ctrl+.
(Ctrl with period)
Previous message (in message tab)Ctrl+,
(Ctrl with comma)
Close read-message tabEsc
Start a new chatc
Search boxs
Other Similar articles that may interest you:
1.How to play screen saver with Windows media player
2. How to create an Invisible folder in Windows
3. Create shortcuts for shutdown Restart and logoff in Windows
4. How to enable/Disable desktop icons in Windows 7 and XP
5. How to add Disk Clean up option to context menu
6. How to save any Webpage as PDF format
7. How to make Window 7 ultimate genuine
8. Winzip 14.5 Pro with keygen free download
9. How to start private browsing in Mozilla Firefox
10. Winrar Latest version free download in all languages  
Continue reading →
Monday, 5 November 2012

How to Enable Disable Missing Security tab in Xp and Seven 7 file and folder property Window

0 comments
Process:
1. Open "My Computer"
2. Click on the "Folder options" on the "Tools" of the Menubar.
Also See: How to enable or Disable permanently appear menubar in Windows 7 and XP
               Add "Folder option" as a shortcut in Windows Context menu.

3. Navigate to "View" tab on the open Folder option Window.
Also Check: How to show all the hidden and unsearchable files and folder in Window 7 without using Command Prompt or any 3rd party application  

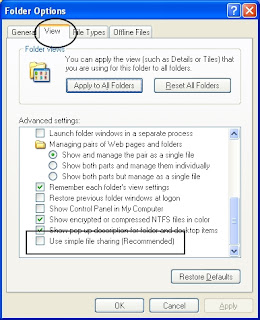
4. Now scroll down the Horizontal scroll bar in "Advanced Setting" till the last.
5.You will find an option "use simple file sharing (Recommended)"
6. To view the security tab in the property window Just uncheck the option otherwise Check the option to hide the security tab.
7. Now "Apply" all the changes and Click on "OK".

Other Similar articles that may Interest you in Windows:
1. Power DVD shortcut keys latest  
2. How to make windows 7 ultimate genuine
3. Total Video Converter with serial key free download
4. Google Chrome offline installer free download
5. How to download a youtube Video
6. How to create a bootable USB pendrive for Windows 7
7. How to increase speed of torrent download in bit torrent
8. How to add your detail descrition of your in the property windows of my computer
9. How to remove the Arrow symbol from the shortcut icon on Desktop
10. How to add a logo to a video file

Most Recommended Post on Mobile and Social Networking:
1. How to disable the facebook account  
2. How to Hard reset or Format a nokia N-Series Mobile
3. How to hard reset or Format a Nokia E-Series Mobile
4. How to get Missed Call alert free in BSNL Mobile
5. How to Break a Samsung Mobile Password without using 3rd Party Software
6. How to get Secure from unwanted calls on Samsung Mobile
7. Some Working special Codes on Nokia Mobile
8. Some Working special Codes on Samsung Mobile
9. How to break a BIOS/CMOS password
10. How to bypass a blocked website in College/Office using proxy
Continue reading →
Tuesday, 30 October 2012

How to show all the hidden files and folder in Windows XP and 7 without using cmd (Command Prompt)

0 comments
The process will make us to view all type of files that are available in our Windows operating System. It will able to show the files that are hidden by the user as well as by the System. It means after completion of the process not a single file is hidden on your Windows XP, Vista and Seven Operating System. This gives solution when the files are hidden or invisible by the Virus.
Process:
1. Open "My Computer"
2. Click on the "Folder options" on the "Tools" of the Menubar.

Also See: How to enable or Disable permanently appear menubar in Windows 7 and XP
                 Add "Folder option" as a shortcut in Windows Context menu.

3. Navigate to "View" tab on the open Folder option Window.
4. Now on the "Advanced Setting" make these two changes
  •    Enable the option "Show Hidden files and folders"
  •    Disable the option "Hide protected operating system files (Recommended)"

Also See: How to create a folder with blank space or With no name
5. Now "Apply" the changes and Click on "OK".

Also Check: How to Install Ubuntu Inside Windows 7

Note: After completion of all the steps you will able to show all the hidden files and Folder. The hidden files and folders are shown as faded.

Other Similar articles that may interest you:
1. Finger arrangement in Typing to become a faster typist
2. Latest "Any TO ISO" pro with serial key free download
3.Working Shortcut keys on VLC Media Player
4. Avast antivirus with serial key free download  
5. How to create Window 7 bootable pen-drive
6. How to download a youtube Video
7. Latest Winzip with serial key free download
8. Test your antivirus program whether it is working properly or not
9. Hotkeys on Microsoft Office Power point 2010
10. Google Book Downloader free download for Windows and MAC
Continue reading →

Followers