Tuesday 30 October 2012

How to show all the hidden files and folder in Windows XP and 7 without using cmd (Command Prompt)

0 comments
The process will make us to view all type of files that are available in our Windows operating System. It will able to show the files that are hidden by the user as well as by the System. It means after completion of the process not a single file is hidden on your Windows XP, Vista and Seven Operating System. This gives solution when the files are hidden or invisible by the Virus.
Process:
1. Open "My Computer"
2. Click on the "Folder options" on the "Tools" of the Menubar.

Also See: How to enable or Disable permanently appear menubar in Windows 7 and XP
                 Add "Folder option" as a shortcut in Windows Context menu.

3. Navigate to "View" tab on the open Folder option Window.
4. Now on the "Advanced Setting" make these two changes
  •    Enable the option "Show Hidden files and folders"
  •    Disable the option "Hide protected operating system files (Recommended)"

Also See: How to create a folder with blank space or With no name
5. Now "Apply" the changes and Click on "OK".

Also Check: How to Install Ubuntu Inside Windows 7

Note: After completion of all the steps you will able to show all the hidden files and Folder. The hidden files and folders are shown as faded.

Other Similar articles that may interest you:
1. Finger arrangement in Typing to become a faster typist
2. Latest "Any TO ISO" pro with serial key free download
3.Working Shortcut keys on VLC Media Player
4. Avast antivirus with serial key free download  
5. How to create Window 7 bootable pen-drive
6. How to download a youtube Video
7. Latest Winzip with serial key free download
8. Test your antivirus program whether it is working properly or not
9. Hotkeys on Microsoft Office Power point 2010
10. Google Book Downloader free download for Windows and MAC
Continue reading →
Sunday 14 October 2012

How to install Ubuntu (Linux) Inside Windows Without using Virtual Machine offline using wubi (Windows-based Ubuntu Installer) Latest version

0 comments
To install latest ubuntu within your Windows environment (XP/ Vista and Seven) we require two files.
1.  wubi (Windows-based Ubuntu Installer)
2.  Ubuntu desktop ISO file

Download Link Wubi: http://www.ubuntu.com/download/desktop/windows-installer
Download Link ISO file:  http://www.ubuntu.com/download/desktop

The above two files are the required files for ubuntu to install it inside windows  offline. The process will install ubuntu Inside your Windows Environment.  No need of separate drive to install Ubuntu. It will install inside your windows and act as dual-boot Operating System. For every version of Ubuntu there is a different wubi. So try to download the accurate version of it. The above two download link will show the download link for the latest version for both the two files.

Process:
1. Download the above two files and place it inside a folder.
2. Now right click on the wubi.exe file and choose "Run as administrator"
3. Now click on "ok" on the UAC (User Account Control ) prompt screen.
4. It will open "Ubuntu Installer"
5.  There you will find 5 option.
 Installation Drive: Choose the drive where you want to install the Ubuntu.
 Installation Size: Allocate the memory for the Ubuntu on the installation Drive (Minimum 5GB)
Desktop Environment: Choose Ubuntu
Language: Choose your preferred language on which you want to install ubuntu.
User Name:  add a user name for Ubuntu (By default windows username but you can also change it)
Password:  Set a password for Ubuntu User.
6.  Click on "Install".
7.  Now the installation process will start.
8. Follow up the instruction by clicking Next.
9. After that it will ask to Reboot your System or Manually reboot later.
10. After reboot you will find two operating system on your Windows boot menu.
11. Choose "Ubuntu".
12. Follow the instruction and complete the Process.
After completion you will able to  use ubuntu. That is it.
Note: Ubuntu needs the driver update for each application to execute. So whenever you are opening an application for first time you make the driver updates by connecting to internet. Ubuntu install many of the hard ware driver automatically. So no need to install sound card, Graphic, Ethernet driver.

Other similar articles that may interest you:
1. How to break password on nokia e series mobile
2.  List of top ten Internet Web browser
3. Add "Start command prompt here" to context menu as a shortcut in Windows XP and 7  
4.  Working Shortcut keys to Adobe reader x  
5. How to create a folder with any name in Windows Xp and Seven
6.  How to convert a .nrg file To ISO file
7.  AVG antivirus pro 2012 free download
8. How to temporary delete a face-book account
9. How to create a CON folder without using cmd
10.  How to get missed call alert free in BSNL mobile
Continue reading →
Sunday 7 October 2012

How to use internal Hard disk memory as External Virtual RAM (Random Access Memory) in WIndows 7 and XP

1 comments
The process will use our Internal Hard disk memory as virtual memory to use it as External RAM. We can able to choose a different memory for our each windows drive to use it as Ram.

1. Open System Properties Window
     Also See: How to open System property Window 
2. Navigate to "Advanced" tab.
Note: For Window Seven users first click on "Advanced System setting" on the left side of system property screen and then go to "Advanced" tab.
3. On the "Performance" Section Choose "Setting".
4. On the open "Performance Option" window Navigate to "Advanced" tab.
5. On the "Virtual Memory" Section click on "change".
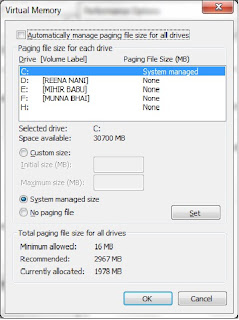
6. It will open Virtual Memory Window.
7. Uncheck the option "Automatically manage paging file size for all drives" for manually allocate memory to use it as RAM from each Windows Drive.If you check the option then Windows will automatically use memory from each drive to use it as RAM.
8. On the drive name Select the drive where you want to allocate memory.
9. Below that you will find an option "Custom Size". Click on that and allocate the memory from that drive to use it as RAM. Otherwise select the option "System Managed size" then Windows Will automatically allocate some memory from that drive to use it as External or Virtual RAM.
10. Now Click on "Set".
11. Similarly you can also repeat the process for other drives also.
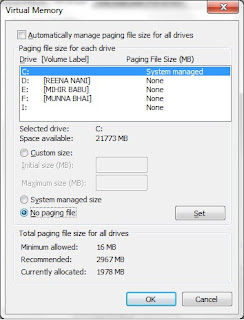
12. If you want to remove this then Choose "No paging file" on step9.
13. Now click on Ok. and save all the open Window by clicking on "OK".
Note: This will create a "pagefile.sys" system hidden file whose size is same as the virtual Ram.

Also Check: How to delete pagefile.sys

Other Similar articles that may interest you:

1. Create a Hidden and unsearchable folder in Windows 7  
2. How to customize the power button action in Window 7 Start menu
3. How to open/bypass restricted/Password protected websites
4. How to set a photo/Wallpaper as folder background
5. Top ten reasons why a system hangs or Crash in Windows
6. Winzip Pro 14.5 with working key free download
7. How to start private browsing in Internet Explorer browser  
8. Some Working Keyboard shortcuts on Yahoo Mail
9. How to get faster download in Torrent using bit torrent
10. How to install Ubuntu Inside Windows without using Virtual Machine  
Continue reading →

How to Delete the pagefile.sys file from Windows XP and Seven (w7) Local Disk Drive.

0 comments
Pagefile.sys file is created whenever we use our Internal Hard disk memory as external or Virtual RAM.

Also Check: How to make our Internal Hard-disk Memory as External RAM in WIndows.

1. Open System Properties Window
     Also See: How to open System property Window
2. Navigate to "Advanced" tab.
Note: For Window Seven users first click on "Advanced System setting" on the left side of system property screen and then go to "Advanced" tab.
3. On the "Performance" Section Choose "Setting".
4. On the open "Performance Option" window Navigate to "Advanced" tab.
5. On the "Virtual Memory" Section click on "change".
6. It will open Virtual Memory Window.
7. Uncheck the option "Automatically manage paging file size for all drives"
8. Now select the drive where pagefile.sys file is situated.
9. Now select "No paging file" and click on "Set".
10. Click on "OK". this will delete the pagefile.sys system file.

If more than one drive contain the pagefile.sys then complete the steps for each drive individually.

Other Similar articles that may interest you:

1. Add "open with notepad" as a shortcut to Context menu
2. How to take a screenshot from windows Desktop without using 3rd party software
3. How to correct system hangs during logon or startup of Window 7
4. Process to Hard-Reset or Format a Nokia-N-Series Mobile
5. How to start Private browsing in Google chrome Internet browser 
6. How to Increase speed of torrent download
7. Google Chrome offline installer free download
8. Window 7 ultimate Activator
9. How to create a bootable pendrive
10. How to change AM/PM symbol with your name in Window 7 task bar
Continue reading →

What is Pagefile.sys in Windows

1 comments

Pagefile.sys is the Windows Virtual Memory. It is created whenever our RAM needs some extra memory for the execution of program.Whenever we are using an application which need some extra Random Access Memory (RAM) than our available RAM then Windows automatically take some memory as virtual memory from our hard disk drive to use it as ram. then the pagefile .sys is created inside the Windows Drive.but sometimes we get that the speed of virtual memory Ram (pagefile.sys) is much slower than the actual Ram.


We find that windows can automatically assign virtual memory from our Windows drive automatically.Whenever windows creates pagefile.sys, its size is larger and very equal to the size of our installed ram.How ever we can also manually update or assign different memory size for different drive.

Note: Windows can not take an external device like USB to use as Virtual Memory.

Also Check: How to delete pagefile.sys in Windows 7?

Other similar articles that may interest you:

1. How to deactivate a facebook Account
2. Add remove folders from the Shortcuts of Favorite bar of wndow 7  
3. How to password protect Microsoft office document  
4. Change the default name of Windows Drive from Local disk to your name
5. Any To ISO Pro Latest with key full version free download
6. Typing Master Pro with key Free download
7.Latest Avast antivirus Pro with key Free download
8. How to make Window Seven Genuine
9. RemoveWat free download
10. Some Working keyboard shortcut keys on Microsoft Office front page 2010
Continue reading →

Followers