Thursday, 31 May 2012

How to Customize Winrar option in the Context menu of Selected Items in Windows

0 comments
The process will describe how to Enable/Disable/Add/Remove/customize the Winrar options/ Command on the context menu of the selected items.

Also See: How to customize the Win Zip option on Context menu of selected items

Process:
1. Open the Winrar program (Start-> All Programs-> Winrar-> Winrar.exe)
2. Click on "option" on the menu bar and then "Setting" (Hotkeys "ctrl+S")
Also See: Various Working Keyboard shortcut keys or hotkeys on Windows
3. Navigate to "Integration" on the Menubar.
Also See: How to enable or ddisable permanently appear menubar in Windows

4. On the Integartion tab You will find an option "Winrar Associated With"
This option will allow you to choose on which type of file format you want to associate with this winrar.
Note: Winrar supports RAR, Zip, CAB, ARJ, LZH, ACE, 7-Zip, TAR, GZip, UUE, BZ2, JAR, ISO, Z file format.
5. On the "Shell Integration" check the option "Integrate Winrar to shell". if this option is not check then Winrar will not show its option on the Context menu.
6. Now click on "Context Menu items". A new window will be open and show you the list of Command that you want to see on the Context menu.
those items are
    Extarct Files
    Extarct Here
    Extarct to
    Extarct each archieve to separate folder
    Open With Winrar
    Add to archieve
    Add to
    Compress to and email.
    Compress and Email
    Convert archieve
Now here check the option that you want to see in the context menu and Click on Ok.


7. Some other options on the Integration tab
"Add Winrar to desktop"- this option will create an shortcut for the program on the desktop of the current user.
"Add Winrar to Start Menu"- this will create shortcut on the start menu of windows to open the program
"Create winrar Program Group"- This will create a group for the program
"Integrate winrar to shell"- this will enable the winrar to context menu
"Cascade Context Menu"- this will show all the Winrar options on the Context menu as a subgroup under Winrar.
"Icons in the Context menu"- this will show the Winrar icons near the options on the context menu.

Also See: Latest version Winrar free download for windows linux and MAC.

Other Similar articles that may Interest You:
1. How to break a mobile password (Samsung) without using 3rd party software
2. How to change boot screen, login screen and start up logo of Windows Xp, Vista and Seven
3. How to create an ultra hidden and unsearchable folder
4. How to break an BIOS or CMOS password without using 3rd party software
5. How to break an administartor password from the user account 
6. How to add "User account" option to the context menu of desktop
7. How to change the default name of "New Folder" in Windows Xp.
8. How to use VLC media player as a camera software
9. Microsoft office Word 2003-2007-2010 Working keyboard shortcut keys
10. Internet Download manager Crack for latest version 2012
Continue reading →
Sunday, 27 May 2012

Yahoo! Axis - Browser description and Download

0 comments
Yahoo Axis! is publicly released on 23rd may 2012 as a search tool.
It is a desktop Browser extension for Yahoo Search Engine developed by Yahoo.This  works within the web browser without installing a new browser and without opening a new tab in our old browser.Yahoo axis opens the search results as a thumbnail in the open tab of the web browser.
This is very similar to yahoo, google and bing toolbar. It also helps to create bookmarks.

Also see:  List of top ten internet web browser for internet access

Supported Devices:
1. It supports apple iphone and Apple Ipad Mobile Browser.
2. It supports Google Chrome (All version), Mozilla Firefox (version 7 and higher),Internet Explorer (version 9 and higher),Apple Safari (version 5 and higher) desktop browser.

Website:  http://axis.yahoo.com/

Other Similar articles that may  interest you:
1. How to make any trial version IDM full version
2. What are the various reason of system hangs or Crash
3. How to know the audio/video quality of a movie from its name
4. How to break a samsung mobile password
5. How to change boot screen, log in screen and start up logo in Windows Seven
6. How to add open with notepad option to context menu of an item
7. How to restore the deleted My Computer and Recycle Bin icon in desktop
8. How to update the Computer time from an internet server
9. Top considerable factors before buying a Laptop
10. How to change the Processor name in windows
Continue reading →
Saturday, 12 May 2012

How to take permission (ownership) of a registry key or Entry in Windows XP, Vista and Seven

0 comments
Also See: How to take ownership of a file in Windows 

Process:
1. Open registry Editor
Check: How to open Registry Editor
2. Select the key whose permission or ownership you want to take.
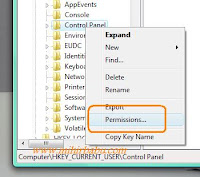
3. Right Click on that key and choose " permission".
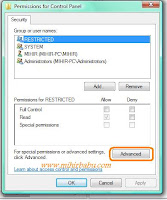
4. Now the Permission Window will open. Now click on "Advanced"


5. Now the Advanced Security Setting for the registry key is opened.
6. Navigate to "owner" tab.
                                  

On the " Current owner" you will find the current owner of that file.
On the "Change owner to" option you will find the list of all the users on the computer. There choose your logged user or the user who want to take permission of that key and Click on "apply"
Now you will find your changed user on the "Current owner " option.

7. checked the option "Replace owner on sub containers and Objects". So that for all the sub keys under that key has the same owner.
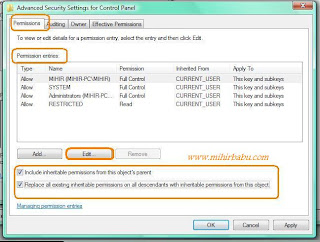
8. Now navigate to "permission" tab in Advanced security setting of the key.

9. Checked the two option
  • Include Inheritable permissions for the object parent.
  • Replace all inheritable permissions on all descendants with inheritable permission from this object.

9. In the "Permission Entries" option choose your logged user whose permission you want to modify and Click on "Edit"
10. On the open Window choose which type of permission you want to take. You can manually choose one one option otherwise choose full control option so that you can able to modify read write on that key.Now apply all the changes and Click on "OK". Close all the open Windows by clicking on "OK".That is it.

Other Similar articles that may interest you:

1. Typing master pro v7.0 with serial key download
2. How to create a "con" folder without using Command Prompt
3. Create a hidden unsearchable file without using 3rd party software
4. Create a folder with blank space or with no name
5. How to add "open with notepad" option to context menu.
6. Avast Anti virus with one year serial key free download
7. How to download a you tube Video using IDM
8. How to download books from Goggle books
9. List Of top ten Internet Browser for Windows
10. How to break a Samsung Mobile Password 
Continue reading →
Thursday, 10 May 2012

How to make the back up/Export/save a registry Entry in Windows Xp, Vista and Seven

0 comments
To make a back up of the Registry Entry first open Registry Editor.

See:  How to open Registry Editor

 How to make the back up of entire registry

1. Click on "file" on Menu bar.

 Also See: how to enable or disable menu bar permanently on Windows

2.Now click on "Export"

3. it will open the browse window.
4. Now open the desired location where you want to save the registry file and give a name to that registry.
5. that is it. Now open that location you will find a back up of your registry. (i.e. the file with .reg extension)

How to make back up Only a single Registry key or DWORD value

1. open Registry Editor.
2. Navigate to the key that you want to save or create a back up for that.
3. Now Right click on that key.

Also see: How to add restart explorer to context menu of desktop

4. Now click on Export.


5. Now open the desired location where you want to save the registry file and give a name to that registry.
6. That is it. Now open that location you will find a back up of your registry. (i.e. the file with .reg extension)

Also Check: How to install or add a registry file in Windows 

Other Similar articles that may interest you:

1. How to block a site with Password in Internet Explorer
2. How to play Screen saver during playback of Windows Media Player
3. How to enable or disable the common desktop icons in Windows
4. How to add "open task manager" option to the Context menu
5. How to get missed call alert free in BSNL mobile
6. How to add a desired photo as folder background In windows
7. How to use Picassa picture Viewer as a camera software
8. How to create a bootable Pendrive for Windows Xp, Vista and Seven
9. How to remove the Arrow symbol from the shortcuts
10. How to make IDM full version  
Continue reading →

How to install or Add a registry file in Windows XP, Vista and Seven

0 comments
1. Open registry Editor.

See: How to open registry Editor and group policy Editor  

2. Now click on File on "Menubar"

Also See: How to enable or disable menu bar in Windows Explorer permanently

3. Now Click on "Import".

4. It will open the "Browse" window.
5. Now choose the registry file that you want to install and click on open.
6. it will show an message that the registry Entry is successfully added to the registry.That is it.


You can also install a registry file by double click on that file (or right click of mouse on that file and choose merge)
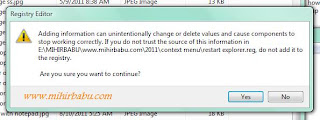
it will open UAC prompt and show you that the adding registry file must be harmful to your system.


Just ignore all the message and click on OK. After that it will show the message that the registry entry is successfully added to the registry.That is it.

Also See: How to make a back up of the registry

Other Similar articles that may interest you:

1. Break a Samsung Mobile Password without using 3rd party Software
2. How to Change Boot Screen, Login Screen and Start up lopgo of windows Vista and Seven
3. How to create a hidden unsearchable folder in Windows
4. How to customize the "Send To" menu in Windows Xp, Vista and Seven
5. How to show or hide the Windows version on desktop
6. Top ten considearable factors before buying a Laptop
7. How to customize the processor name
8. How to create an automatic login without asking for password
9. Create a bootable pendrive from iso image file to format c: drive
10. Remove the arrow symbol from the shortcuts without using 3rd party software  
Continue reading →
Monday, 7 May 2012

WinRAR- latest free download for Windows X86 & x64 (32-64 bit) in All Languages (Evaluation Copy)

0 comments
Winrar is a free and very powerful compressesed archieve manger.
Also see: Winzip 14.5 with serial key free download
Supports: 
1. It supports all type of compressed file format like RAR, ZIP, CAB, ARJ, LZH, TAR, GZ and  
      TAR.GZ, BZ2 and TAR.BZ2, ACE, UUE, JAR, ISO, 7Z, Z (Unix Compress).
2. Winrar supports all the 32 bit and 64 bit  (i.e. x86 and x64 bit) operating system.
3. Winrar supports various languages like Arabic, Armenian, Bulgarian, Chinese, Croatian, Czech, Dutch, English, Estonian, Finnish, French, Georgian, german, Greek, Hebrew, Hungarian, Indonesian, Italian, Japanese, Korean, Lithunian, Macedonian, Norwegian, Persian, Polish, Portugese, Portugese Brazilian, Romanian,  Russian, Serbian Cycrillic, Serbian Latin, Slovak, Slovenian, Spanish, Spanish (Latin American), Swedishi, Thai, Turkish, Ukranian, Uzbek, Valencian, Vietnamese etc.

Other Similar articles that may interest you:
1. How to create a con folder without using Command prompt
2. How to create an Invisible folder
3. How to use VLC media player as a CAmera Software to take photo and record video
4. Some working Shortcut keys on Cyberlink Power DVD.
5. How to add a background Photo in a pendrive
6. How to test our antivirus whether it is working or not
7. Create a folder with no name or with a blank space
8. Typing master Pro v7.0 with serial key free download
9. How to customize the power button action in start menu of Windows seven
10. Top reasons why a system hangs or crashes  
Continue reading →

Followers